
I have just finished putting together a new gallery wall in my home office. Although creating a gallery wall is fun, there’s quite a lot to it– it’s not just a matter of buying frames, placing the photos and putting them on a wall. You need more of a considered approach for the best results.
The first decision to make is which wall they’re going on; ideally, a wall with lots of space where your photos will be looked at often. The wall that I chose, as mentioned above, is in my home office. Since we moved into this house about eleven years ago, I’ve had the same framed photos on this particular wall – photos that I took twenty to thirty years ago whilst on various overseas holidays. I’ve enjoyed them for many years, but my daughter recently showed interest in having some of them on her bedroom wall, so I decided it was time for a change!
Once you’ve decided on a wall, you need to decide what type of photos you want displayed. It might be a collection of travel photos, or historical family photos. Maybe they are professional photos that you haven’t yet had a chance to do anything with, and they’re still sitting on the USB!
The design, or layout, of the gallery wall will be dependent upon the number and type of photos you want displayed. You may prefer all the photos and frames to be the same size, or you might like the idea of varying sizes. You may already have a layout in mind, but if not, researching on Pinterest or similar is a good place to start for inspiration and ideas. You then need to decide whether to have the photos framed professionally, or whether the frames are bought off the shelf. This really comes down to your budget.
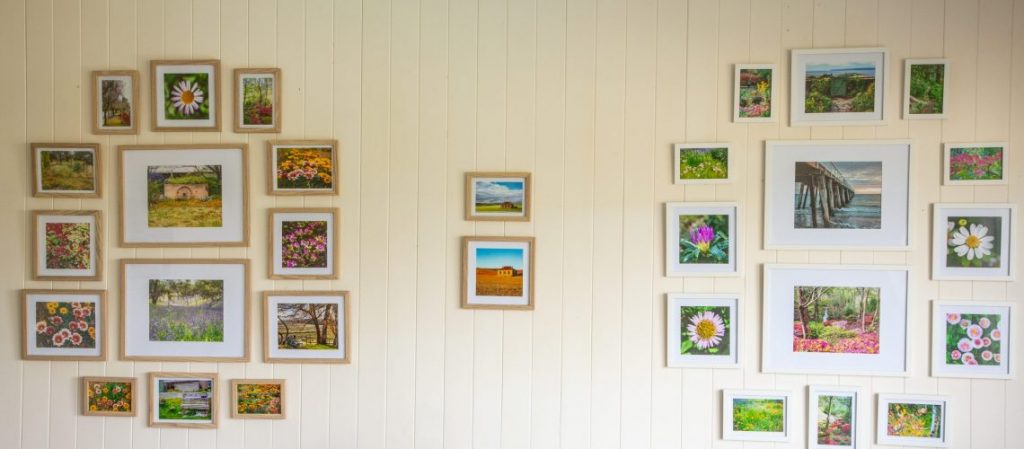
In my case, I had already bought two sets of gallery frames online. I had them in mind to use for business purposes and was never intending to use them in the house, but in the end that’s exactly what I did. As the frames were of varying size and each set was a different colour (being white and natural timber), I had to choose photos that would suit. I went with photos I’d taken in South Australia over the past two years, being landscapes, seascapes and flowers. Once I’d chosen the images to use, I had to size them according to the ratio required for each of the frames. I then had them printed at a professional lab to get the best result possible.
Once all the photos had been printed and I’d put them into the frames, I laid them out on the floor making two separate galleries – one for each set of coloured frames – to see how they looked before getting them onto the wall. I already had an idea of the layout that I wanted, but this gave me the opportunity to play around and swap photos where necessary.
If I hadn’t already bought the frames, and as I’ve done for clients in the past, I would have created a mock-up of my intended design using Photoshop to ensure the overall layout was in proportion to the wall and the various photos worked well together taking into account their colour, content, size and design.
For me, the most difficult part of the process was hanging the photos on the wall, replicating the intended layout. This took time and patience, and above all else, a measuring tape and some mathematical skills! If you are not sure about hanging the photos yourself, I would strongly suggest hiring someone to do it for you.
In the end, I was very glad to have gone through the process of creating my two galleries. I now have a new series of photos to look at, and it’s great to have a change.
If you would love to create a gallery wall but need help in selecting and preparing the photos for printing, coming up with the layout, and sourcing the frames, please don’t hesitate to contact me.